Mobile carriers offer a call forwarding service that you need to enable on your phone by dialling carrier-specific codes followed by a phone number. We’ll show you how to set up call forwarding on Android and iOS without dialing any codes.
How to Set Up Call Forwarding on Android
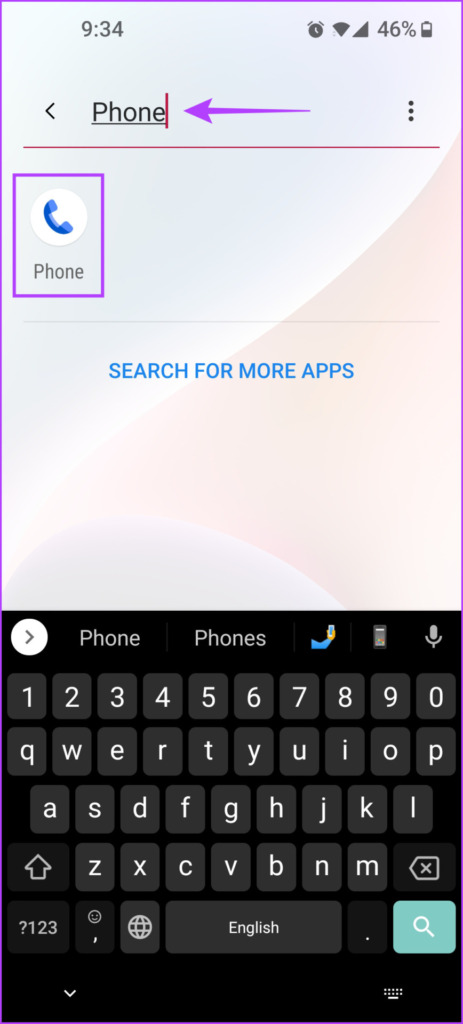
Most Android phones let you configure call forwarding using its default Phone app. However, the actual options may differ depending on the make and Android version of your phone. Here’s how you can enable call forwarding on your Android phone: Note: Some mobile operators may not offer a call forwarding facility directly. You’ll need to contact them if you find the call forwarding option missing or greyed out on your phone. Step 1: Open the app drawer to search and launch the Phone app on your Android phone. In our case, we are using Google’s default Phone app. Step 2: Inside the Phone app, tap on the vertical three-dot menu, followed by Settings. Step 3: In the Phone app Settings, tap on the option that says Calling accounts. On some Android phones, the Calling accounts option can be located under a separate Calls menu. Step 4: Tap on the Call forwarding option. Step 5: You will need to choose an appropriate call forwarding option by tapping on it. If you’re confused, continue reading as we explain all four options and their use cases.
Always forward: Selecting this option will forward all the incoming calls to another number until you completely disable it. When busy: This option lets you forward calls when you’re already busy talking to somebody on your phone and want the incoming call handled by someone else. When unanswered: This option only forwards calls when you can’t pick up the incoming calls and want them transferred to another phone number. When unreachable: This option only forwards incoming calls when your phone is in Airplane mode, switched off, or has no cellular reception.
For this example, we have chosen to use the ‘Always forward’ option. You can choose any other call forwarding option as per your requirements. Step 6: Type in a number you want to forward your calls to. You can also tap the contacts button beside the text field to select a saved phone number. Once that’s done, tap on the Turn on button. After that, you will see a phone icon with an arrow in the status bar to indicate that call forwarding is enabled. Furthermore, you can follow the same steps listed above and remove the number we entered in Step 6 to quickly disable call forwarding on your Android phone. You may want to check our guide to fix technical issues while picking up incoming calls on Android.
How to Set Up Call Forwarding on iOS
iOS also offers a built-in call forwarding option that can be enabled using the Settings app. Here’s how you can quickly set up and enable call forwarding on your iPhone. Step 1: Open the Settings app on your iPhone and tap Phone. Step 2: Tap on Call Forwarding. Step 3: Turn on the toggle for Call Forwarding. Step 4: Next, tap on the Forward To option. Step 5: Type in a number where you want to forward the calls. Then tap on the Back button. That’ll put a phone icon with a little arrow next to the mobile operator name whenever you open the Control Center to indicate that call forwarding is enabled. If this method doesn’t work for you, ensure you have the Wi-Fi and Cellular data temporarily disabled while you perform the steps to enable call forwarding. To remove call forwarding number, follow the process above till the Step 5 and delete the number.
Call Forwarding Made Easier on Android and iOS
That’s how you can enable or disable call forwarding on your Android and iPhone. Enabling the call forwarding feature ensures that all your incoming calls are dealt with, even if you receive them on your secondary phone, eliminating the need to carry multiple phones. The above article may contain affiliate links which help support Guiding Tech. However, it does not affect our editorial integrity. The content remains unbiased and authentic.


![]()